Thursday, August 16

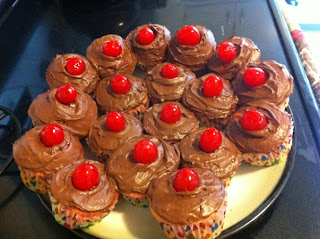
Spumoni Cupcakes

It sure has been a little bit since I've posted anything. We were moving, and I'm still not totally ready to use my spare time crafting/baking in the new house since I'd like everyone else to get super comforable and settled and rooms decorated before I organize and decorate my new crafting room! Anyhoo - on to the most recent recipe I made off Pinterest...

I pinned this recipe a WHILE ago (almost 6 months), knowing that I would be making them for a very good friend's birthday. He loves spumoni ice cream, so I figured these would be a hit. They're pretty easy, and the reviews were amazing.

So, here's the ingredient list & recipe:

INGREDIENTS

1  box Betty Crocker® SuperMoist® white cake mix
Water, vegetable oil and eggs called for on cake mix box
3/4 of box (4-serving size) pistachio instant pudding and pie filling mix
1/4 cup cherry juice (from jar of maraschino cherries)
1 container (12 oz) Betty Crocker® Whipped chocolate frosting
18 whole maraschino cherries with stems

RECIPE
  • Heat oven to 350°F (325°F for dark or nonstick pans). Place paper baking cup in each of 18 regular-size muffin cups.
  • Make cake mix as directed on box; divide batter evenly into 2 bowls. Add 3/4 box pudding mix to 1 of the bowls; mix well. To other bowl, add cherry juice; mix well.

  • Divide pistachio batter evenly among muffins cups. Divide cherry batter evenly over pistachio batter in muffin cups.
  • Bake cupcakes and cool completely as directed on box. 
  • Frost cupcakes with frosting. Top each with cherry.
The only things I changed were: I didn't use Betty Crocker cake mix since I figured the cheapest cake mix would be fine and easier on my wallet. I used a little more pudding mix and cherry juice than what was called for, AND I couldn't find cherries with stems! So, unfortunately, they weren't fancy cherry toppers. 

I didn't take many picture this time since I was doing five million other things in preparation for my daughter's birthday, which is the same day as my friend's, but you get the idea. I don't really have much to add either. I don't love pistachio, so I didn't taste them this time, but I might actually try one next time I make them because of the raving reviews. These were so easy that I'll be making them again real soon.


Saturday, March 24

Grease.

I made a delightful breakfast today for the family... eggs, bacon, sausage, and toast.  Yum!  I can't remember the last time I made bacon, but whenever that was, I know I did not have this trick up my sleeve for taking care of the bacon grease (since I'm not one to re-use it).


For a small amount of grease, line a bowl with aluminum foil, pour hot grease into foil, wait for it to harden, and toss it in the trash!  Just in case that's not easy to follow,  ;)  here are some pictures:


If you have a large amount of used grease/oil, please be sure to take it to your local landfill for proper disposal or find a restaurant that recycles their oil and ask if you can add yours to their grease bin.


For this and a few other helpful tips:  [I would love to enter the blog's link here, but I can't get it to work.]  Please look up "....and Spiritually Speaking"'s blog entry from March 16, 2012

Saturday, March 17

HAPPY ST. PATRICK'S DAY! (asparagus)

In honor of St. Patrick's Day, I decided to start today off with a green vegetable.  I love asparagus, but I never knew how to cook it until now!  Every time I made it, I just winged it, and every time, without fail, it was mushy.  I found this recipe on Pinterest for "crispy parmesan asparagus sticks," and I wanted to try it.  The main problem was that I didn't have two of the items needed to make it - a wire rack or panko bread crumbs.  I figured that the cook time would work for the asparagus even if I didn't have those items.


My ingredients:
1 bunch of asparagus
parmesan cheese
salt and pepper to taste


My instructions:
First preheat the oven to 425 degrees F.  Rinse the asparagus and quickly cut off the tough ends, then put them on a foil-lined cookie sheet and LOAD them with salt and parmesan cheese (while they're still wet so the toppings will stick).  Sprinkle a little pepper on top for good measure.  Put them in the oven for 15 minutes, flipping halfway through -- the cheese will be melty and may have started to burn a little bit, so beware of tearing through the foil. Take them out, put them on a plate, and add a bit more cheese!


The asparagus was good.  Crispy on the outside, soft on the inside and, of course, cheesy (which makes everything better!).  I will definitely use this cooking method more often and maybe even try the actual recipe one day because a little crunch might make this one of my favorite vegetable dishes!


Here's the link to the inspiration for this dish:
http://www.howsweeteats.com/2011/03/crispy-parmesan-asparagus-sticks/ 

Thursday, March 15

Irish Cream Cupcakes

Tuesday night, when I got home from work, I knew it was time to get packing and clean up the kitchen because my mother-in-law and brothers-in-law were coming over for a hot minute, and we had the people who are going to be renting our house coming over to sign the lease.  I packed up some of the pictures from around the house, and did some dishes.  BUT - the real highlight of my night was baking cupcakes.  ;)  For our Wednesday night church gathering, we were having an Irish feast in honor of St. Patrick's Day nearing.  So I'd decided to make Irish Cream Cupcakes.  I found this amazing recipe on Pinterest and went to work.  I can't remember ever making cupcakes from scratch, so I'm going to say this was my first time and I had great results, which I will completely attribute to the awesome recipe!  Here's how I made them:
 
Cupcake Ingredients:
2 1/2 c flour
3 tsp baking powder
1/2 tsp salt
1/2 tsp cinnamon
1 1/2 c granulated sugar
12 Tbs butter, at room temperature
2 whole eggs
2 egg whites
2 tsp vanilla extract
1/2 c Bailey's Irish Cream non-alcoholic coffee creamer

Cupcake instructions (makes 24 cupcakes): 
  • Preheat oven to 350ºF. Line muffin tins with 24 cupcake liners.
  • In a large bowl, whisk together flour, baking powder, salt, and cinnamon.
  • In the bowl of an electric mixer, cream together sugar and butter until light and fluffy, about 2–3 minutes. Add eggs and egg whites one at a time, beating on low between each addition. Add vanilla.
  • Add flour slowly in 3 additions, alternating with Bailey’s, starting and ending with flour.
  • Fill cupcake liners about 2/3 full and bake 15–17 minutes, or until a cake tester comes out clean. Allow to cool in the pan for 5 minutes, then transfer to a wire rack to cool completely.
I pretty much followed the directions, except I did put in a little extra Bailey's, and I think my cupcakes were in the oven for 18 minutes.  Also, I don't have a wire rack, so I flip over a 13x9 cake pan and let them rest on top of that.  After they were cooled, I put them on a baking sheet and let them rest overnight in the oven -- safely away from the wandering fingers in my house.

Then Wednesday came and the work day went by... I picked the kids up from my in-laws' house, and went home to make the buttercream frosting! I know I'd never made frosting before, so I was in for a real treat.


Buttercream frosting ingredients (to frost 24 cupcakes generously):
2 c butter
8 c powdered sugar
6 Tbs Bailey's Irish Cream non-alcoholic coffee creamer


Frosting instructions:
  • For the frosting, beat butter in an electric mixer until light and fluffy. Add powdered sugar 1/2 cup at a time, until completely mixed. Add the Bailey’s and beat until well combined.
  • Poke holes in the tops of the cupcakes and brush some Bailey’s on each before frosting. Load frosting into a piping bag fit with a large tip and decorate as desired.
  • If you want to frost all 24 cupcakes with as much frosting as I’ve pictured above, you’ll want to double the frosting recipe.
I made the frosting just how it said to, except I'm not totally sure I got exactly 8 cups of powdered sugar because I was running low, and finished off my supply making this.  I ended up just pouring the rest in from the bag.  I also added a little extra Bailey's until I thought it tasted good.

I also don't own a brush for things like this, so I poured the Bailey's into a 1/8 tsp measuring spoon for every two cupcakes, and just poured it on and spread it around with the bottom of the spoon.

For the frosting, I bought this pretty sweet piping tool.  It was $10 at Target and came with 4 different tips.  I loaded the frosting in and piped it on, added sprinkles to all, and shiny green shamrocks to some.  Voila! Beautiful and delicious cupcakes!

These were well received at last night's gathering and the leftovers were appreciated at work today.  I treated myself to half a cupcake today, and, seriously, they're amazing!

Here's the link to the original blog, enjoy!:

Monday, March 12

St. Patrick's Day Rainbows

Today the kids and I decided to do a St. Patrick's Day craft/treat for all 9 kids at our church gathering on Wednesdays. (I'd like to apologize on the front end for the horrible pictures included in this blog.  I only had my phone on me at the craft time.)


This is super easy and fun for younger kids to be involved in.  My 2-year-old son even got in on the action, and we learned the colors of the rainbow and worked on counting!  My 4-year-old is a genius, so she "already knows those things," but she was willing to do the craft in spite of her great knowledge.  ;)


I also liked this craft because it was fairly cheap, and Rolos were on sale at Meijer this week.  We added our own special touches to it, too.  We included a necklace and a pencil with each bag of candy.  All St. Patrick's Day stuff was already 50% off at Joann's, so we picked up the necklaces there, and the pencils were from the dollar store.


Here's what you need for what we made:
cellophane bags
pencils
bead necklaces
2 bags of rainbow Twizzlers
2 bags of Rolos (I'm pretty sure any gold-wrapped candy would work)
green ribbon ribbon


Here's how we did it:


Drop 10 Rolos into each bag.  Layer the rainbow Twizzlers into the bag bent into "U" shapes over the Rolos (purple, blue, green, yellow, orange, red).  The great thing about each bag of rainbow Twizzlers is that there are 5 of each color in every bag... something that is mentioned on the original blog, but is so unbelievable and amazing at the same time!  Then twist the top closed, put a twisty tie on it, then put a pencil on top, wrap a necklace around the twist and pencil, the top it off with a ribbon tied in a sweet bow.


Here's the link to the original blog:
http://www.ourbestbites.com/2012/03/st-patricks-day-rainbows/

Sunday, March 11

First Post.

My idea for this blog came after I made a recipe I found on Pinterest.  I just started doing the Pinterest thing at the beginning of this month, and I love it!! (along with most other women I know)  I just wanted to make a tribute-type blog for everything I try off Pinterest.  SO - since this idea came AFTER I made these amazing "Easy Parmesan Knots" last Wednesday and AFTER all 40 of them were eaten, I have no pictures of that endeavor, and my only proof that I made them is my Meijer receipt and the happy people who ate them and can attest to the goodness.  Here's the link:


Seriously - make them, eat them.  They are pretty, and I hear they are delicious, as I was not able to have any on the day I made them.